This paper was originally presented at the Great Lakes Great
Database Workshop in
Deploying VFP Apps
with Inno Setup
Session 7
Rick Borup
Information Technology Associates
Voice: 217.359.0918
Email: rborup@ita-software.com
Overview
In this session you will learn about the Inno Setup installer and how to use it to deploy Visual FoxPro applications. You will learn how to generate an Inno Setup script using the script wizard, analyze how an Inno Setup script is constructed, learn how to add the VFP runtime files and ActiveX controls to a script, see how Inno Setup installs and uninstalls an application, and learn how to enhance and maintain Inno Setup scripts to customize them for your specific needs and preferences.
What is Inno Setup?
Inno Setup is a free installer for Microsoft® Windows® applications. The name “Inno Setup” stands for Innovative Setup and was coined by its author, Jordan Russell. The product was first released in 1997. Since that time, several new and updated versions of Inno Setup have been released as the product has gained in popularity.
Inno Setup is a powerful yet simple installer that can be readily used to deploy the kinds of applications typically created with Visual FoxPro. It is a script-based tool that is easy to learn and easy to use, and it supports all 32-bit versions of Windows®. Inno Setup scripts are simple ASCII text files, meaning that you can read and even edit them with any text editor in addition to using the Inno Setup compiler itself. A variety of third-party tools are available to complement this product. In this session we will look at one in particular, ISTool, which provides a GUI interface to Inno Setup scripts that makes maintaining them a breeze.
How does Inno Setup work?
Inno Setup creates a single EXE as the installation package. To distribute an application using Inno Setup, simply build and distribute the EXE. The contents of the EXE are compressed, so it is as small as possible. To install your application, the user just has to run the EXE. Inno Setup also provides an uninstall feature, so uninstalling the application is as simple as using the Windows® Add/Remove Programs applet or clicking the application’s uninstall icon, if you chose to create one.
One thing to be aware of is that Inno Setup does not use the Windows Installer. This can be good or bad, depending on how you look at it. Windows Installer, of course, is Microsoft’s own tool for installing software. In some deployment scenarios, the use of Windows Installer may be required; for example, it may be a corporate requirement, or you may want to use Windows Installer to help qualify your application for Windows Logo certification[1]. Windows Installer, however, is a much more complex technology [see the author’s session on Understanding Windows Installer], whereas Inno Setup is much simpler to learn and to use. Although the Windows Installer technology itself is free—in fact it is built into the operating system, starting with Windows® 2000, and is available as a free add-on for earlier versions of Windows®—tools that build Windows Installer setups are typically not free, other than the version of InstallShield Express that ships with Visual FoxPro. Inno Setup, on the other hand, is truly free, even for commercial use. Being aware of these kinds of trade-offs will help you to make the appropriate decision as to the best installer for your needs.
Who uses Inno Setup?
Inno Setup has been around for several years, and, not surprisingly, has been used to create the installation packages for many different applications from many different sources. Applications installed with Inno Setup turn up in several places. In fact, you may have used Inno Setup yourself without even knowing it: if you’ve installed Beyond Compare from Scooter Software (a tool no developer should be without), HTML-Kit from Chami.com (a real nice, free HTML editor), or any one of several PC Magazine utilities, you’ve used Inno Setup.
One of the PC Magazine utilities installed with Inno Setup is the Unclean utility, which is an enhanced front-end for the Add/Remove Programs applet. Unclean shows you a great deal more information about your installed applications than the Add/Remove Programs applet does, including—in some cases—which tool was used to install it. You can use Unclean to browse your installed apps and to spot the ones that may have been installed with Inno Setup, as shown in Figure 1.
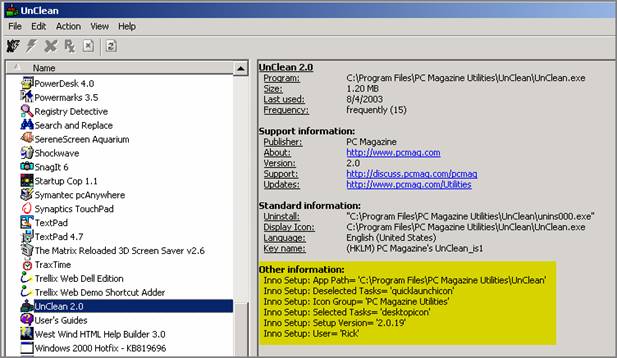
Figure 1: PC Magazine’s Unclean utility displays more information about your installed applications than the Add/Remove Programs applet does. You can tell if an application was installed with Inno Setup by looking under “Other information”.
Versions of Inno Setup
Inno Setup is actively enhanced and supported. There have been many new releases of the product since its introduction in 1997. As of this writing (October, 2003) the current release version of Inno Setup is version 4.0.8. Version 4.0 has been in beta until just recently; prior to that, the current release version was 3.0.7. Version 4.0 is fundamentally the same product as version 3.0, however, which is good news because it means your 3.0 scripts will still work in 4.0 and you won’t have a lot of re-learning to do to move up to 4.0.
Although there are many enhancements in version 4.0, probably the biggest one is the ability to write custom scripts using Pascal scripting. This has been accomplished by incorporating into Inno Setup a complete set of enhancements that previously were available as a third-party product known as My Inno Setup Extensions. The ability to insert code into Inno Setup scripts using Pascal scripting significantly expands the possibilities for customization of your setups. It is important to note, however, that—just as in version 3.0—you do not need to write code to author an Inno Setup script, so for many setups the tool is still as simple to use as ever.
The examples in this session are compiled in Inno Setup version 4.0.5-beta, but we will not deal with Pascal scripting or other version 4.0-specific enhancements here. A complete list of the enhancements and changes in version 4.0 can be found at http://cvs.jrsoftware.org/is/is4dev-whatsnew.htm.
Structure of an Inno Setup script
An Inno Setup script is a text file with an ISS file name extension. Internally, it looks a lot like an INI file in that it has sections, whose names are enclosed in square brackets, and each section has one or more entries. The length (in characters) of these entries will vary depending on your requirements but there is always only one entry per line. In some text editors, longer lines may wrap to the next line if they overflow the visible width, but for syntax purposes one entry is always one line, and a new entry always starts on a new line.
Setup section
The Setup section of an Inno Setup script, which begins with [Setup] in the ISS file, contains the global settings and directives for the install. Entries in this section identify, at a minimum, the name of the application, the version, and a default installation directory. The easiest way to begin to become familiar with Inno Setup scripts is by example, and Inno Setup ships with some sample scripts to get you started. Below is one of these sample scripts, illustrating the Setup section entries and more. Believe it or not, this is a complete (although simplistic) script from which a functioning setup.exe could be compiled.
Listing 1: Inno Setup scripts are easy to read and understand. This is one of the sample scripts that ships with Inno Setup.
; -- Sample1.iss --
; Demonstrates copying 3 files and creating an icon.
; SEE THE DOCUMENTATION FOR DETAILS ON CREATING .ISS SCRIPT FILES!
[Setup]
AppName=My Program
AppVerName=My Program version 1.5
DefaultDirName={pf}\My Program
DefaultGroupName=My Program
UninstallDisplayIcon={app}\MyProg.exe
[Files]
Source: "MyProg.exe"; DestDir: "{app}"
Source: "MyProg.hlp"; DestDir: "{app}"
Source: "Readme.txt"; DestDir: "{app}"; Flags: isreadme
[Icons]
Name: "{group}\My Program"; Filename: "{app}\MyProg.exe"
Looking at the script in Listing 1 it’s pretty easy to figure out what it does, which is to install an application named “My Program” that consists of three files, MyProg.exe, MyProg.hlp, and Readme.txt. Even without knowing anything about Inno Setup script syntax, you can probably also figure out that it creates a shortcut to MyProg.exe.
One thing to mention are the script elements enclosed in braces, namely {pf}, {app}, and {group}. These are called constants and are used as placeholders for things whose actual value won’t be determined until installation time. As you might be able to infer from the context, {pf} represents the user’s Program Files directory. The {app} constant points to whatever directory the user selects for installation of the application, and the {group} constant refers to the user’s Start Menu folder. Inno Setup comes with a complete help file that lists all of these constants as well as providing a reference to anything else you’d want to know about Inno Setup. You’ll also see more about constants later in this paper.
As you can see from Listing 1, the entries in the Setup section of a script are written in the format of directive = value. This syntax is unique to the Setup, Messages, and LangOptions sections of a script. The entries in the other sections of a script consist of one or more parameter-and-value pairs. The syntax for these entries is parameter: value(s). Multiple parameters and value(s) on the same line (i.e., in the same entry) are separated by semi-colons, as illustrated by the following Files section entry for the MSCOMCTL.ocx ActiveX control:
Source: C:\WINNT\System32\mscomctl.ocx; DestDir: {sys}; Flags: regserver sharedfile restartreplace
Files section
As its name implies, the files section of the script lists the files that are to be installed. You can see from Listing 1 that three files are to be installed. In addition to the names of these files, you can see that they are going to be copied to the {app} directory. The special flag isreadme in the entry for the ReadMe.txt file identifies it to Inno Setup as the “readme” file for this installation; this tells Inno Setup to offer to display it to the user when installation is complete. More information about readme files follows later in this paper.
Icons section
The Icons section is used to define the shortcuts that are to be created. Shortcuts can be created on the user’s Start Menu, on the desktop, or anywhere else you might want them. In Listing 1, you can see that the shortcut to MyProg.exe will be created in a group named “My Program” on the user’s Start Menu.
Constants
We mentioned earlier that constants are used to represent things whose specific value won’t be known until installation time. Inno Setup constants are categorized as directory constants, shell folder constants, or other constants according to the type of value they represent. Some of the most commonly used constants are presented in Table 1.
Table 1: These are some of the most commonly used constants. See the Inno Setup help file for a complete list.
|
Constant |
Description |
|
{app} |
The application directory, i.e, the destination directory the user selects to install the application |
|
{win} |
The Windows® directory |
|
{sys} |
The Windows® system directory |
|
{pf} |
The Program Files directory |
|
{cf} |
The Common Files directory |
|
{group} |
The Start Menu folder |
|
{userdesktop} |
The user’s desktop folder |
|
{commondesktop} |
The “all users” desktop folder |
Creating a new Inno Setup script
You can create a new Inno Setup script in a number of ways. The most basic of these is simply to type it in from scratch, although that’s a lot of typing and not usually how one would do it. Another way is to copy a similar script and make changes to accommodate requirements of the new script. This can work well if you are creating a script for a new application whose installation requirements are similar to another application for which you already wrote a script. The third way is to use the Inno Setup script wizard. This nifty little tool, which comes with Inno Setup, makes is a snap to create a basic script for your application in just a few simple steps.
The sample application myVFPApp
Throughout this session we’ll be referencing a sample application called myVFPApp. This is a simple little application written in VFP 8.0. It displays a form with a calendar control on it. When the user clicks on a date the program looks for an entry for that date in a data table called myData.dbf; if one is found, its contents are displayed in an edit box on the form. This application provides a good example of how to create an Inno Setup script because it installs a main executable file, a data file, a readme file, an HTML help file, the VFP runtime libraries, and an ActiveX control.
Using the script wizard
Let’s see how to create the initial script for myVFPApp using the script wizard. The first step is to start the scrip wizard by choosing File | New from the Inno Setup main menu. Leave the “Create a new empty script file” check box unchecked, otherwise you’ll get a blank script and will need to type it all in by hand.
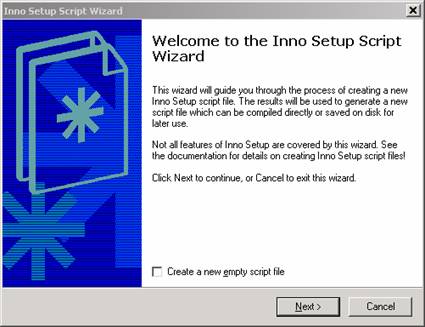
Figure 2: The Inno Setup script wizard makes it easy to create a new script.
As with all wizards, simply use the Next button to move from one step to the next until you’re finished. Most of the steps in the script wizard are self-explanatory, and are not discussed in detail here. The only thing that may not be self-evident is how you change the destination directory for files you are installing. Figure 3 shows the script wizard dialog where you add the file that you want to be installed.
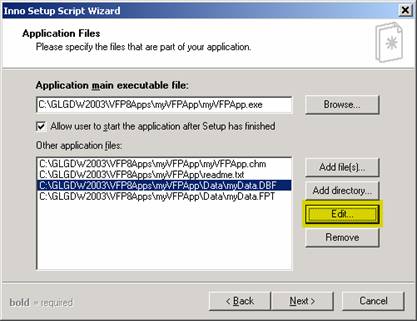
Figure 3: In this step you can add the files to be installed, and—after adding them—can edit them if necessary, for example if you need to specify a different destination directory.
The drive and path information shown in the dialog in Figure 3 are for the source file; unless you specify otherwise, the destination directory for all files added in this step is the directory to which the application is being installed, as determined by the {app} constant.. If some files need to go in a different directory, you can easily specify this later by editing the script, but you can also specify it here in the script wizard by editing the entries for those files. In Figure 3, note that the Edit button is highlighted; selecting a file from the list and clicking on the Edit button opens the dialog shown in Figure 4.
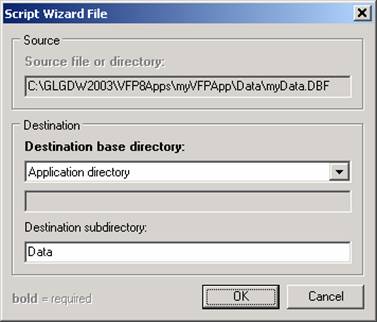
Figure 4: You can specify a different destination directory for a particular file by editing its entry in the script wizard.
By editing the entry for the table file myData.dbf, we can tell the script wizard that this file should be copied to the Data sub-directory under the application directory. Obviously, the memo file myData.fpt belongs in the same place as its table file, so you would edit the entry for the memo file the same way.
You may have noticed that in Figure 3, where we are specifying the files to be installed, we did not include the VFP runtime support library files. There are two reasons for this: one is that these files, along with the HTML Help support library and the ActiveX control, are installed to different directories than the application itself, and in some cases require special handling such as registration; the other reason is that the installation of these files tends to be the same from one app to another, so it makes sense to create the script entries for these files once, save them in a separate file, and then copy or include them into your scripts as needed. We’ll come back to this topic after finishing the script wizard.
The rest of the steps in the script wizard are self-explanatory. When you finish the script wizard, Inno Setup generates the scripts and opens it in the compiler’s edit window and offers to compile it for you, as shown in Figure 5. You may or may not want to compile the script at this time. If not, it’s easy to do so later by simply clicking the Compile icon on the toolbar or choosing File | Compile from the main menu. One thing you probably do want to do at this time, however, it to give the script a name and save it to disk. Until you do this, the script is untitled and will be lost if you close it without first naming and saving it.
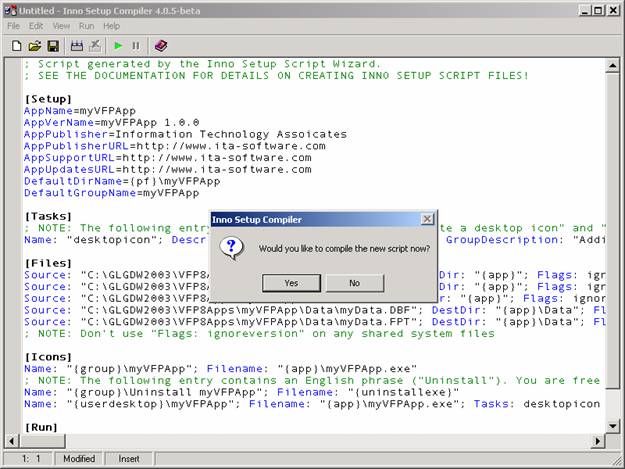
Figure 5: When the script wizard is finished, the generated script is opened in the compiler’s edit window and Inno Setup offers to compile it for you.
The script generated by the script wizard
The script generated by the script wizard is shown in Listing 2. This script will compile successfully and generate a Setup.exe file, but of course we are going to want to add the VFP runtime libraries, the HTML Help runtime library, and MSCOMCT2.ocx ActiveX file, and make a few enhancements to the Setup section before this script will be fully ready to deploy the sample application.
One thing you can observe in the script at this point, though, is the effect of specifying the Data sub-directory for the data files. Look in the Files section of the script and find the entries for myData.dbf and myData.fpt, then read across to the DestDir parameter; note that it is {app}\Data, indicating that these files should be copied to the Data sub-directory under the {app} directory at installation time. If you hadn’t edited these entries in the script wizard, you could easily edit the script now and simply add \Data after {app} to accomplish the same thing.
Listing 2: This is the script generated by the script wizard. The comments were inserted by the script wizard. This script is included in the downloads for this session as myVFPApp Script Wizard Script.iss.
; Script generated by the Inno Setup Script Wizard.
; SEE THE DOCUMENTATION FOR DETAILS ON CREATING INNO SETUP SCRIPT FILES!
[Setup]
AppName=myVFPApp
AppVerName=myVFPApp 1.0.0
AppPublisher=Information Technology Associates
AppPublisherURL=http://www.ita-software.com
AppSupportURL=http://www.ita-software.com
AppUpdatesURL=http://www.ita-software.com
DefaultDirName={pf}\myVFPApp
DefaultGroupName=myVFPApp
[Tasks]
; NOTE: The following entry contains English phrases ("Create a desktop icon" and "Additional icons"). You are free to translate them into another language if required.
Name: "desktopicon"; Description: "Create a &desktop icon"; GroupDescription: "Additional icons:"
[Files]
Source: "C:\GLGDW2003\VFP8Apps\myVFPApp\myVFPApp.exe"; DestDir: "{app}"; Flags: ignoreversion
Source: "C:\GLGDW2003\VFP8Apps\myVFPApp\myVFPApp.chm"; DestDir: "{app}"; Flags: ignoreversion
Source: "C:\GLGDW2003\VFP8Apps\myVFPApp\readme.txt"; DestDir: "{app}"; Flags: ignoreversion
Source: "C:\GLGDW2003\VFP8Apps\myVFPApp\Data\myData.DBF"; DestDir: "{app}\Data"; Flags: ignoreversion
Source: "C:\GLGDW2003\VFP8Apps\myVFPApp\Data\myData.FPT"; DestDir: "{app}\Data"; Flags: ignoreversion
; NOTE: Don't use "Flags: ignoreversion" on any shared system files
[Icons]
Name: "{group}\myVFPApp"; Filename: "{app}\myVFPApp.exe"
; NOTE: The following entry contains an English phrase ("Uninstall"). You are free to translate it into another language if required.
Name: "{group}\Uninstall myVFPApp"; Filename: "{uninstallexe}"
Name: "{userdesktop}\myVFPApp"; Filename: "{app}\myVFPApp.exe"; Tasks: desktopicon
[Run]
; NOTE: The following entry contains an English phrase ("Launch"). You are free to translate it into another language if required.
Filename: "{app}\myVFPApp.exe"; Description: "Launch myVFPApp"; Flags: nowait postinstall skipifsilent
Adding the VFP runtime support library files
Adding the VFP runtime support library files to a script is a simple matter of inserting some entries into the Files section, plus an entry in the Run section. One thing to be aware of when deploying applications written in VFP 8.0 is that the GDI-Plus component (GDIPlus.dll) needs to be installed before the VFP8run.dll file can be registered. In Inno Setup, this is a simple matter of placing the GDIPlus.dll before the VFP8 DLLs in the Files section of the script.
The script entries necessary to install and register the VFP 8.0 runtime support libraries, along with the VFP 8.0 HTML Help support library and the ActiveX file MSCOMCT2.ocx needed by our sample application, are shown in Listing 3.
Listing 3: The script entries necessary for installing and registering the VFP 8.0 runtime support library files, VFP 8.0 HTML Help support library, and the MSCOMCT2.ocx ActiveX control, can be stored in a separate file and then copied into your script as needed. This script is included in the downloads for this session as VFP8 Runtimes.iss.
[Files]
;**********************************************************************
;
; VFP8 runtime support libraries and related files
;
;**********************************************************************
; Microsoft Graphics Device Interface Plus (GDI+) DLL
Source: "C:\Program Files\Common Files\Microsoft Shared\VFP\gdiplus.dll"; DestDir: "{cf}\Microsoft Shared\VFP"; Flags: sharedfile uninsneveruninstall restartreplace
; Microsoft Visual FoxPro 8.0 Runtime Support Libraries
Source: "C:\Program Files\Common Files\Microsoft Shared\VFP\vfp8r.dll"; DestDir: "{cf}\Microsoft Shared\VFP"; Flags: regserver sharedfile uninsneveruninstall restartreplace
Source: "C:\Program Files\Common Files\Microsoft Shared\VFP\vfp8t.dll"; DestDir: "{cf}\Microsoft Shared\VFP"; Flags: sharedfile uninsneveruninstall restartreplace
Source: "C:\Program Files\Common Files\Microsoft Shared\VFP\vfp8renu.dll"; DestDir: "{cf}\Microsoft Shared\VFP"; Flags: sharedfile uninsneveruninstall restartreplace
; Microsoft Visual C++ 7.0 Runtime DLL
Source: "C:\WINNT\System32\msvcr70.dll"; DestDir: "{sys}"; Flags: uninsneveruninstall onlyifdoesntexist
; Microsoft HTML Help Runtime Files for Visual FoxPro 8.0
Source: "C:\Program Files\Common Files\Microsoft Shared\VFP\foxhhelp8.exe"; DestDir: "{cf}\Microsoft Shared\VFP"; Flags: sharedfile uninsneveruninstall restartreplace
Source: "C:\Program Files\Common Files\Microsoft Shared\VFP\foxhhelpps8.dll"; DestDir: "{cf}\Microsoft Shared\VFP"; Flags: regserver sharedfile restartreplace uninsneveruninstall
;**********************************************************************
;
; ActiveX Controls --> {sys} directory
;
;**********************************************************************
Source: "C:\WINNT\System32\mscomct2.ocx"; DestDir: "{sys}"; Flags: regserver sharedfile restartreplace
[Run]
Filename: "{cf}\Microsoft Shared\VFP\Foxhhelp8.exe"; Parameters: /RegServer
In the DestDir parameter for these files, note the use of the {cf} and {sys} constants to specify the user’s Common Files and Windows System directories. Also note that DLL and OCX files can be registered by including the regserver flag in the Files section, whereas an EXE such as FoxHHelp8.exe should be registered by running it from the Run section with the /RegServer parameter.
Again, Listing 3 is not a complete script and should not be run on its own; it is merely a convenient way to store the entries needed for the VFP 8.0 runtime support library files, and the other files commonly installed with a VFP application. We will need to insert them into the script generated by the script wizard before compiling the script.
One way to insert these entries into the script is to simply copy and paste them. As an alternative to copying and pasting, Inno Setup provides an #include directive that can be used to insert script entries from another file. Files that you insert in this way do not have to have an ISS file extension; they must simply be text files that contain valid Inno Setup script entries, and might also be stored as TXT files.
To insert the script entries in Listing 3 into your script, you would use
#include "VFP8 Runtimes.iss"
All of the entries in an included file are inserted into the script at the point where the #include directive is placed. To use the #include directive for everything you see in Listing 3, therefore, you would need to break it into two parts—one for the Files section entries and the other for the Run section entry—and use two different #include directives at the appropriate places in your script.
Enhancing and finishing the script
Although the script now includes all of the files we want to install, there are still several enhancements we can make to improve it. Some of these will make the installation go more smoothly for the user, while others will make things go more smoothly for us as developers. Most of these changes will be accomplished by adding directives to the Setup section, but we will also add a Registry section and a couple of additional entries in the Run section.
Enhancing the Setup section
Adding an AppID
One thing that you should always do is to use an AppID to identify this application to Inno Setup. If subsequent versions of the same application use the same AppID, Inno Setup will know to append the uninstall information for the updated version(s) to that from the earlier version(s). This avoids creating multiple entries in the Add/Remove Programs list, such as myApp 1.0, myApp 1.1, etc. The value you choose for your AppID does not have to be the same as your AppName, although it can be and will be by default if you do not specify an AppID. The value of the AppID is never displayed to the user, so it can be something with meaning only to you, perhaps even a GUID. We’ll use a common text string in this example, though. The entry to create an AppID is
AppID=myVFPApp
Adding a copyright
If you add a copyright entry to your script, it will be displayed during installation but only if the full-screen background is turned on using WindowVisible=yes. The preferred standard these days is to use WindowVisible=no, however, in which case the copyright will not be seen. Nonetheless, you can still insert a copyright entry in your script if only to assert your copyright to anyone else reading the script.
AppCopyright=Copyright © 2003 Information Technology Associates
Using a mutex
A mutex (which stands for “mutually exclusive”) value can be used to prevent the installation or uninstallation from running if the application itself is already running. This works only if your application creates a mutex of the same name in the first place. In VFP, you can create a mutex using the Windows API.[2] The entries to check a mutex in your Inno Setup script is
AppMutex=myVFPApp
Warning if a
directory exists
If the directory to which the application is being installed already exists, you can use the DirExistsWarning directive to tell Inno Setup whether or not to warn the user about this condition. The possible settings are auto, yes, or no. If set to auto, the user will be warned if the directory exists unless it contains a previous version of the same application and UsePreviousAppDir is set to yes. These values seem to make the most sense for updates. Note that the default value for UsePreviousAppDir is ‘yes’, so it does not need to be set explicitly.
DirExistsWarning=auto
UsePreviousAppDir=yes
Specifying a source
directory
You can save yourself from having to type a lot of full drive and path specifications in the Files section by specifying a SourceDir in the Setup section. The value of SourceDir tells the compiler where to look for files named in the Files section. If you keep your “gold” files (files that are ready for release) in a certain directory but your setup script is in another directory, use the SourceDir directive to identify the directory where the source files are located.
SourceDir=C:\GLGDW2003\VFP8Apps\MyVFPApp
Specifying an
output directory
Similarly, if you want your compiler output (setup.exe) to be placed in a specific directory, use the OutputDir directive. If an OutputDir is not specified, setup.exe is created in a sub-directory named Output under the directory in which the script is located. Note that if you do specify an OutputDir but do not use a fully qualified path name, then the value of OutputDir will be relative to SourceDir. You can also specify a name other than ‘setup’ for the compiler output using the OutputBaseFileName directive.
OutputDir=C:\GLGDW2003\Sessions\Inno Setup\Output
OutputBaseFilename=myVFPApp Setup
Specifying a
license file and other information
You can specify a license file to be displayed at the beginning of the installation process. If a license file is specified, the user will have to accept it at installation time before setup will proceed. You can also specify files containing information you want to display to the user before and/or after installation. These last two are referred to as the “info before file” and the “info after file.” Like the license file, these can be either TXT or RTF files.
LicenseFile=C:\GLGDW2003\Sessions\Inno Setup\license.rtf
InfoBeforeFile=C:\GLGDW2003\Sessions\Inno Setup\InfoBefore.rtf
InfoAfterFile=C:\GLGDW2003\Sessions\Inno Setup\InfoAfter.rtf
Specifying a
minimum version of Windows®
If you want to restrict the installation to certain versions of Windows®, you can specify a MinVersion directive. MinVersion takes two values: the first pertains to Windows 9x/Me and the second to Windows NT/2000/XP. You can find a complete reference to the values of MinVersion and the version of Windows to which they correspond in the Inno Setup help file. In our example, we are specifying a minimum of Windows 98 or Windows NT SP4.
MinVersion=4.01.1998,4.00.1381sp4
Showing a full
screen background
To show a full screen gradient background during installation, you can use the WindowVisible directive with a value of ‘yes’. The newer standard for installers is not to do this, however, so a value of ‘no’ is preferable here, and in fact this is now the default if the WindowVisible directive is not specified at all.
WindowVisible=no
Using different
image files
You can specify different image files for the setup wizard to display at installation time. Many image files are available for download, and of course you also can create your own if you want create a highly personalized appearance. If you decide to use an alternative image, you will want to specify both a large image, which appears on the left-hand side of the setup wizard during installation, and a small image, which appears at the top of the setup wizard. Details on size and format can be found in the Inno Setup help file. The use of the “compiler: ” prefix tells Inno Setup to look for the specified file in a path relative to the compiler itself.
WizardImageFile=compiler:images\WizModernImage13.bmp
WizardSmallImageFile=compiler:images\WizModernSmallImage13.bmp
Avoiding the statup
prompt
In earlier versions of Inno Setup, the first thing the user would see when running setup.exe was a dialog asking if they really wanted to install the application. Many people found this redundant at best and annoying at worst, so the DisableStartupPrompt directive was created to enable you to suppress this dialog. In Inno Setup version 4.0 the default is ‘yes’—meaning do not display this dialog—but you can still include it explicitly if you want to.
DisableStartupPrompt=yes
Adding a Registry section
Inno Setup can create registry entries for you if you want them. This is easily accomplished by adding a [Registry] section to your script. The standard location for registry entries for application software is Software\<company name>\<application name>. The Registry section entries in our example script illustrate how to create these entries under the registry’s HKEY_CURRENT_USER and HKEY_LOCAL_MACHINE root keys.
[Registry]
Root: HKCU; Subkey: "Software\ITA"; Flags: uninsdeletekeyifempty
Root: HKCU; Subkey: "Software\ITA\MyVFPApp"; Flags: uninsdeletekey
Root: HKLM; Subkey: "Software\ITA"; Flags: uninsdeletekeyifempty
Root: HKLM; Subkey: "Software\ITA\MyVFPApp"; Flags: uninsdeletekey
Root: HKLM; Subkey: "Software\ITA\MyVFPApp"; ValueType: string; ValueName: "InstallPath"; ValueData: "{app}"
The last entry is really one line in the script, but overflows the margins on this page. This entry uses the {app} constant to capture the installation directory chosen by the user at installation time and to store it in a registry key named “InstallPath”.
The flags associated with each of the Registry section entries in this example control how Inno Setup treats them when the application is uninstalled. Like most Inno Setup flags, it’s easy to understand what these flags do just by reading their names. As with all flags, the Inno Setup help file has the details.
Completing the Run section
There are a couple of things to do in the Run section before we’re finished and ready to compile the script. One of them is to register the VFP HTML Help executable, Foxhhelp8.exe. Because this is an EXE rather than a DLL, it is registered by running it with Parameters: /RegServer in the Run section rather than by using Flags: regserver in the Files section, as is the case with DLLs.
Filename: "{cf}\Microsoft Shared\VFP\Foxhhelp8.exe"; Parameters: /RegServer
Finally, we would like to provide the user with the option to view the Readme file after installation is complete. While this can also be done using the isreadme flag in the Files section, as mentioned earlier in Listing 1, the approach shown below is more generalized and is therefore considered to be the preferred way to do this.
The key to making this step optional for the user is the postinstall flag, which tells Inno Setup to display this item with a check box on the Setup Completed page of the setup wizard. Also note the use of the shellexec flag, which tells Inno Setup to open this file using the application associated with its file type. To be safe, always use a TXT or RTF file for your readme file, under the assumption that these will always be registered file types on the user’s computer (e.g., that Notepad or WordPad or Word itself will always be installed). Use of shellexec with other file types, such as PDF, are okay if you know that the associated application is installed on the user’s machine; however, it the associated application is not installed, an error will result.
Filename: "{app}\readme.txt"; Description: "View the README file"; Flags: postinstall shellexec skipifsilent skipifdoesntexist
We’ve now made all of the required additions to this script, as well as several optional but desirable enhancements, and are now ready to compile it into a setup executable to install the application.
Compiling the script
Compiling an Inno Setup script is about as easy as it gets: all you have to do is open the file with Inno Setup[3] and click the Compile button on the toolbar or choose File | Compile from the main menu. As the script is being compiled, the individual steps are shown in the Compiler Status window, which automatically opens beneath the script editing window. Figure 6 illustrates the Compiler Status window showing compilation complete for the sample application. This is not the complete log; there are several steps that occurred above what is visible in Figure 6.
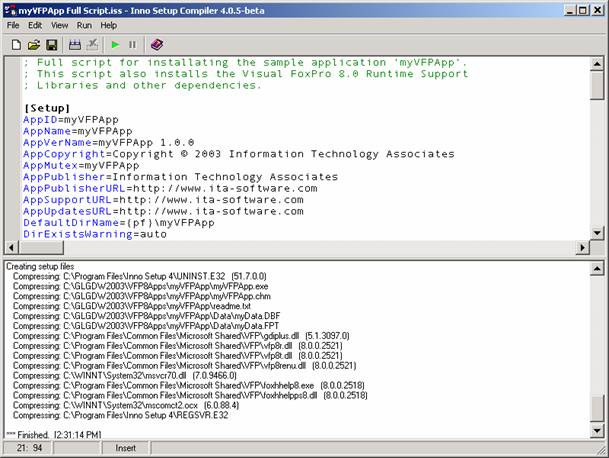
Figure 6: The Compile Status window opens below the edit window and lists each step during the compilation of a script.
One of the nice things about Inno Setup besides its inherent simplicity is that if an error is encountered during compilation, compilation is halted and the offending line of script is highlighted in the edit window. There aren’t too many things that can cause errors during compilation anyway; probably the most common ones are a missing file or a misspelled name. In any case, errors are generally easy to detect and to correct.
If you did not specify a different output file name, the output from the compiler will be setup.exe. In the example we’re using here, we specified an OutputBaseFilename of myVFPApp Setup, so the output from the compilation above is a file named myVFPApp Setup.exe.
Installing the application
To install the application, simply run the setup executable file. There are no external files to distribute besides the setup.exe file. During installation, Inno Setup presents a wizard-based sequence of steps that is easy for the user to understand and to follow.
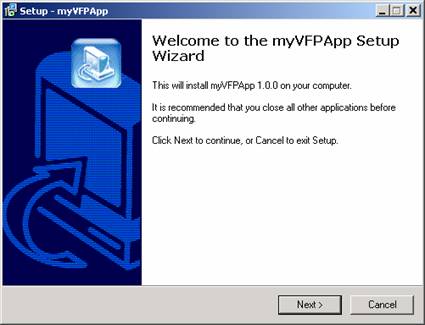
Figure 7. The Welcome screen is the first thing the user sees.
The first screen that is presented during installation is the Welcome screen. It identifies the application that is about to be installed. Note that there is a Cancel button on this screen and on all succeeding screens up to the actual installation step. This provides the end user with a way out before committing to the actual installation step. It is also helpful to you as the developer because it allows you to preview your installation up to the point of actually performing the install, which can be useful as you are fine-tuning a script.
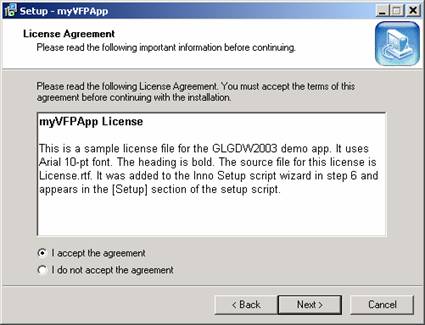
Figure 8. The user must accept the license before installation can proceed.
If a license file was specified, it is presented next as shown in Figure 8. The ‘Next’ button in this step is disabled until the user clicks the option to accept the terms of the license agreement.
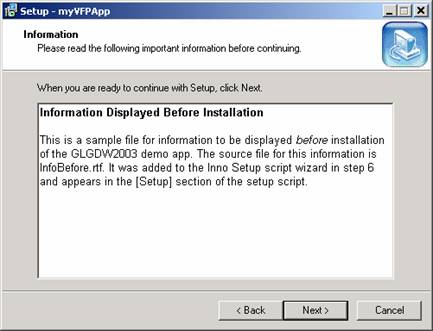
Figure 9: The contents of the ‘InfoBeforeFile’ are shown here.
If you included an ‘InfoBeforeFile’, that information is shown next. This is a good place to present instructions to the user and to have them be sure they are ready to proceed with the installation. If not, they can still cancel at this point.
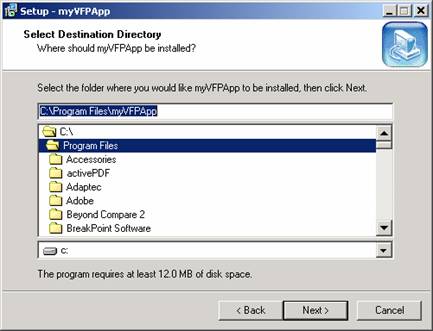
Figure 10.Unless you have specifically disallowed it, the user can select the destination directory in this step.
The next step is for the user to select the destination directory, as show in Figure 10. The default value specified in the script will be automatically displayed. The value chosen by the user in this step, whether or not it is the default value, becomes the value of the {app} constant and applies to the remainder of the script during installation.
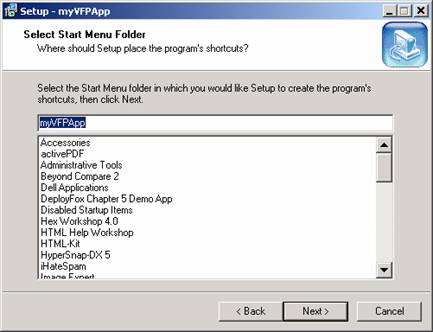
Figure 11. The user can select the Start Menu folder for shortcuts.
If Start Menu shortcuts are being created, the user can select their location. The default value specified in the script is preloaded in the dialog shown in Figure 11.
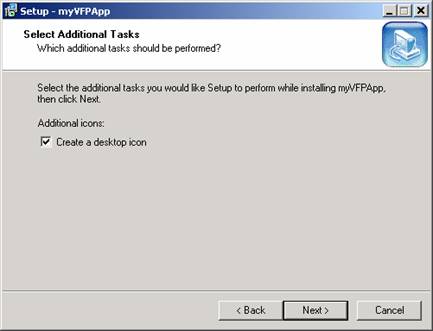
Figure 12. Optional tasks are displayed with a check box before installation begins.
If optional additional tasks were specified in the script, such as creating a desktop icon, they are presented next. Figure 12 shows how this dialog appears to the user.
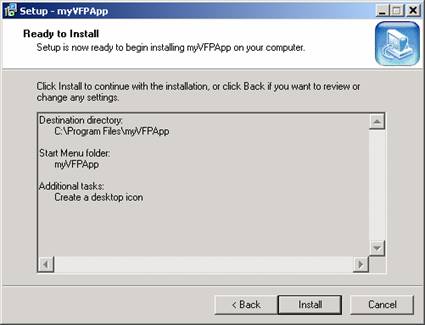
Figure 13. The installation settings are summarized in this dialog before actual installation begins.
The Ready to Install dialog shown in Figure 13 is the final step before installation begins. This dialog summarizes the installation settings and is the user’s last chance to bail out before the actual installation begins. Notice that the button for the next step on the Ready to Install dialog is labeled “Install” instead of “Next”.
During the actual installation of the application, a progress indicator is displayed and incremented as the various steps are completed.
Following completion of the actual installation, the contents of the ‘InfoAfterFile’ are displayed, if one was specified. This is shown in Figure 14.
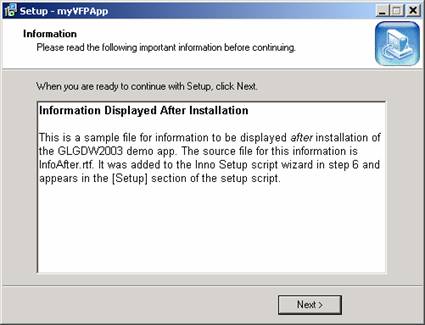
Figure 14. The ‘InfoAfterFile’ is a good place to tell the user anything else you might want them to know before actually launching the newly installed application.
If you use an RTF file for the InfoBeforeFile and the InfoAfterFile, you can exercise some control over the appearance of the text in these dialogs. In Figure 14, an RTF file was used so that the title line could be made bold and so a specific font could be used.
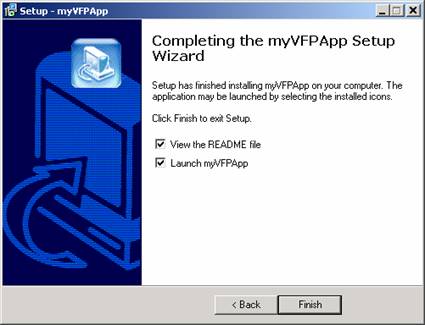
Figure 15. The last dialog in the setup wizard can be used for things such as opening the readme file and/or launching the application.
The Setup Complete dialog shown in Figure 15 is the final screen the user sees before the setup wizard terminates. If your script calls for any optional post-installation steps, they are presented here.
That’s it! Your application is now installed and ready to be used. We think Inno Setup delivers a professional-looking user interface that your users will appreciate and find easy use. Remember that you can create your own image files for use with the setup wizard, giving you the opportunity to provide a highly personalized look to your installations if desired.
Deploying an update
Unless your application undergoes a major change between versions, you won’t have to make many changes to your original setup script to get it ready to deploy the updated version of the application. If all you’re doing is sending out an updated EXE, for example, then probably the only thing you’ll want to change in your setup script is the value of the AppVerName property so that it corresponds to the build version of your EXE file. For example, if the original script was for version 1.0.0 or your app and you are now preparing to deploy version 1.5.0, you would replace
AppVerName=myVFPApp 1.0.0
with
AppVerName=myVFPApp 1.5.0
in your script. Note that nothing requires the version number in the Inno Setup AppVerName property to be the same as the build version of your EXE file, but for a VFP app with a single EXE it makes sense to do it this way.
If the new version of the application needs to install files that were not included in the initial installation, you simply need to add entries for these new files to the Files section of the script.
Careful consideration needs to be given to how you handle existing data files during an update. You may want to install empty data files as part of the initial installation of your application, but you certainly do not want to reinstall those same empty data files as part of an update, because that would overwrite the user’s live data files and wipe out everything they had done since the initial installation.
Let’s use the sample application as a case in point. The script in Listing 2 was designed for the initial installation of the application. The Files section from Listing 2 is reproduced below for easier reference.
[Files]
Source: "C:\GLGDW2003\VFP8Apps\myVFPApp\myVFPApp.exe"; DestDir: "{app}"; Flags: ignoreversion
Source: "C:\GLGDW2003\VFP8Apps\myVFPApp\myVFPApp.chm"; DestDir: "{app}"; Flags: ignoreversion
Source: "C:\GLGDW2003\VFP8Apps\myVFPApp\readme.txt"; DestDir: "{app}"; Flags: ignoreversion
Source: "C:\GLGDW2003\VFP8Apps\myVFPApp\Data\myData.DBF"; DestDir: "{app}\Data"; Flags: ignoreversion
Source: "C:\GLGDW2003\VFP8Apps\myVFPApp\Data\myData.FPT"; DestDir: "{app}\Data"; Flags: ignoreversion
; NOTE: Don't use "Flags: ignoreversion" on any shared system files
You can observe the ignoreversion flag on each of these script entries. This flag was placed there by the Inno Setup script wizard, although it really pertains only to versioned files like the EXE. As you would expect from its name, it tells the installer to overwrite the file on the user’s computer regardless of the version number. For the initial installation of an application, this is okay, at least for files that are specific to the application itself. (Note the comment, also placed in the script by the script wizard, about not using ignoreversion with shared system files.) In the script for the updated application, leave the ignoreversion flag on the entry for the EXE file.
When it comes to the data files, however, you need to make a change to the flags when deploying an update. You can see that the script installs a DBF file and an FPT file to the Data sub-directory. These are the data files that the user will update while using this application. During an update, you do not want to overwrite these files.
Your choices are to remove the entries for these files from the update script, or to use certain Inno Setup flags to protect against overwriting the user’s data during installation of an update. We prefer the second approach because that way the script for an update remains as close as possible to the script for the initial install. If your update scripts don’t even mention files you installed as part of the initial installation, and you haven’t looked back at your initial installation script for several months, you might even forget that those files are part of the application. Keeping them in the update script, but in such a way that they do not overwrite live data on the user’s computer, is a good way to remind yourself what’s really on the user’s computer.
The most important flag that you will want to use with the data files when deploying an update is the onlyifdoesntexist flag. This flag tells the installer to copy the file to the user’s computer only if the file doesn’t already exist on that computer. In this way, you can protect against overwriting an existing data file (which presumably has been updated by the user since the initial installation) while at the same time ensuring that the file will get copied if for some reason it doesn’t exist on the user’s computer.
Another useful flag when working with data files (or others, for that matter) is the uninsneveruninstall flag. This flag tells the uninstaller not to remove the file when the application is uninstalled. The reason you might want to use this flag with data files is to protect against them being removed if the user unintentionally uninstalls the application (if you don’t have users who do this from time to time, consider yourself lucky!).
If you decide to use the onlyifdoesntexist and uninsneveruninstall flags for your data files, then change the entries for those files as shown below.
Source: "C:\GLGDW2003\VFP8Apps\myVFPApp\Data\myData.DBF"; DestDir: "{app}\Data"; Flags: onlyifdoesntexist uninsneveruninstall
Source: "C:\GLGDW2003\VFP8Apps\myVFPApp\Data\myData.FPT"; DestDir: "{app}\Data"; Flags: onlyifdoesntexist uninsneveruninstall
If you are confident that these files—or, more importantly, some other files with the same names—won’t exist on the user’s computer during the initial installation of the product, then it’s okay to use the onlyifdoesntexist flag in the script for the initial installation as well. If you’re going to use the uninsneveruninstall flag at all, then of course it’s a good idea to use it in the initial installation script, too.
One other aspect to deploying an update is what to do if you need to uninstall files that were installed by an earlier version. For example, suppose the initial installation of the application installed a file named MyFile.DBF; also suppose that this file is no longer needed with the new version of the application and you would like to remove it when you install your update. Inno Setup provides a way for you to do this by using an InstallDelete section in the script.
If an InstallDelete section is present, its entries are processed as the first step during installation. To tell the installer to remove MyFile.DBF from the user’s computer during installation of an update, you would add the following entries to your script. (This example assumes that MyFile.DBF was installed to the {app} directory.)
[InstallDelete]
Name: {app}\MyFile.dbf; Type: files
Entries in the InstallDelete section require both a “Type” and a “Name”. The Name of course is simply the name of the file; it can include constants such as {app} to specify the location of the file on the user’s computer. The “Type” entry can have one of three values: files, filesandordirs, and dirifempty. To remove a single file, use the “files” value (you can use wildcards in the “Name” if you need to remove multiple files this way.) The other two values allow you to remove entire directories; refer to the Inno Setup help file for more information.
Maintaining your scripts with ISTool
Inevitably, you will be required to make changes to your applications and you will therefore also be required to distribute updated setup packages. Doing this in Inno Setup is simply a matter of editing your original script to specify a new version number, to add additional files (if any), to remove old files (if necessary), and so forth.
As you have already seen, Inno Setup scripts can be easily edited by hand using either the Inno Setup compiler itself or any other text editor. However, using an editor of any kind to maintain your scripts is still a manual process. If you’d prefer to use a visual tool with a GUI interface, take a look at ISTool.
ISTool is a separate product from a different author. However, it is integrated with the Inno Setup Compiler so that you can compile your scripts by invoking the Inno Setup compiler directly from within ISTool. This makes it a one-stop solution for maintaining existing scripts.
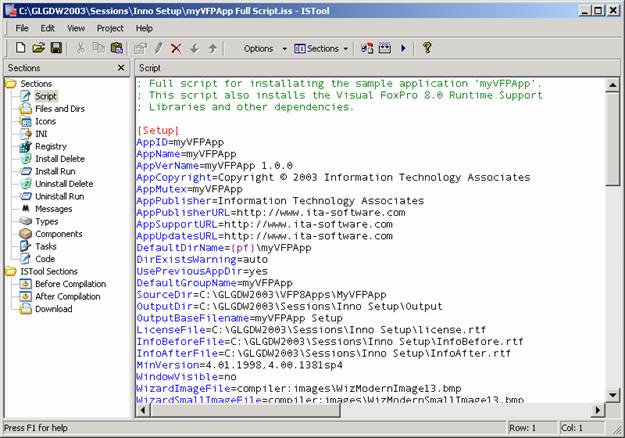
Figure 16. ISTool has its own script editor and also provides a navigation panel for the various sections of the script.
ISTool has its own editor built in, so you can use it to view and edit the entire script much the same way you would use the Inno Setup Compiler itself. The real power of ISTool, though, is that it provides an interactive property-sheet view of the Setup section and an interactive grid-like (row-column) view of the other sections of the script with individual property sheets for the various flags and other settings available in each section.
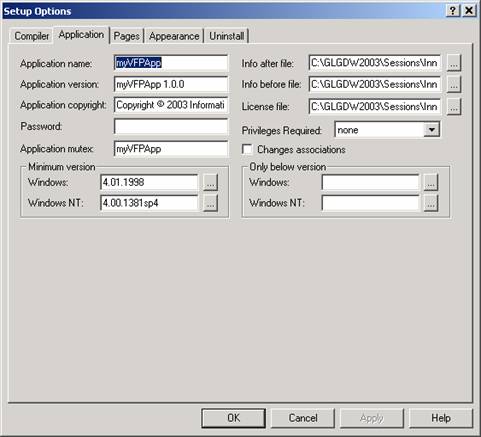
Figure 17. ISTool provides a property sheet you can use to inspect and edit the setup options.
The property sheet view of the Setup section directives is illustrated in Figure 17. This is very useful because it groups similar directives together and allows you not only to see their existing values, if any, but also to see which directives are available but have not been set.
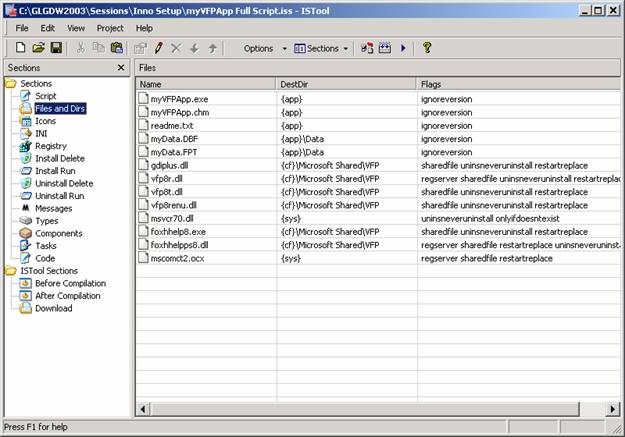
Figure 18. The row-column view of the Files section is very helpful in examining its contents. There is a similar view of the other sections, too.
The row-column view of the individual script sections is very useful for verifying that flags are properly set, for example, because the columns are aligned and the values in a given column can be easily compared up and down several rows. You can right-click on a row and select Properties from the context menu to view the property sheet for that entry, as shown in Figure 19.
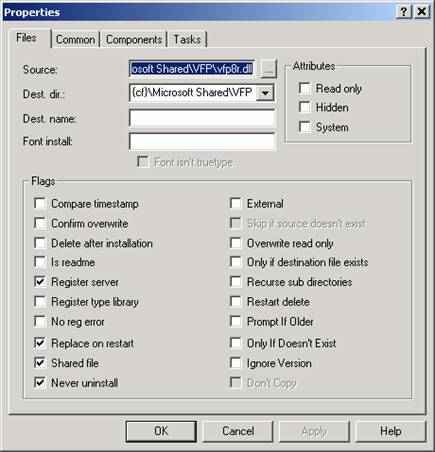
Figure 19. The source, destination, and flags for an entry in the Files section can be viewed and edited on the ISTool property sheet for that entry.
Using the property sheets to set values is also useful because you don’t have to remember the exact syntax and spelling of flags and parameters; the property sheet inserts the appropriate entries into the script for you.
ISTool can also provide a tree view of the Files section, and the Icons and the Registry section as well. Be default, the entries in these sections are displayed in list form, as illustrated in Figure 18. The list view is useful in many ways, among them that you make multiple selections and apply properties to all of the selected files in one step. But sometimes is it useful to see the Files section in tree view format, and ISTool makes this possible by unselecting Files As List from the View menu. In tree view form, the Files section looks like Figure 20.
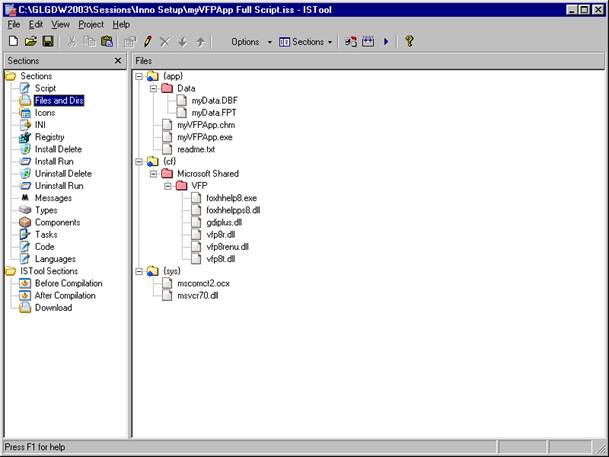
Figure 20. ISTool can display the Files section, as well as the Icons and Registry sections, in tree view form as well as in list form.
We find ISTool to be a highly useful tool both for inspecting and verifying existing scripts prior to compilation and deployment, as well as being our preferred tool for updating existing scripts. You can invoke the Inno Setup compiler directly from ISTool, as illustrated in Figure 21, and you can select an option under the ISTool Preferences dialog to associate the ISS file name extension with ISTool so that opening an ISS file from Explorer brings it up in ISTool directly. Because of these capabilities, we find that ISTool is typically the only tool we use to edit and maintain our existing scripts after building them for the fist time with the Inno Setup script wizard.

Figure 21.You can invoke the Inno Setup compiler directly from ISTool.
Conclusion
Inno Setup is a powerful yet simple installer that is easily learned. It can handle the installation requirements for applications of the type that many developers create with VFP. Additional tools such as ISTool make it even easier to maintain Inno Setup scripts. If your deployments do not require you to use Windows Installer, Inno Setup is certainly worth looking into.