This paper was originally presented at the Great Lakes Great
Database Workshop in
Understanding
Windows Installer
Session 8
Rick Borup
Information Technology Associates
Voice: 217.259.0918
Email: rborup@ita-software.com
Overview
In this session you will learn about the Windows Installer, Microsoft’s core technology for installing Windows® software applications. You will learn about the design objectives for Windows Installer, take a look inside a Windows Installer database and see how it is put together, think about how to design your applications with Windows Installer deployment in mind, learn how to handle upgrades, updates, and patches, and in general become more comfortable using a Windows Installer-based setup tool.
What is Windows Installer?
Windows Installer is Microsoft’s answer to the need for an open, standardized approach to installing Windows application software. Windows Installer was originally created for Microsoft Office, and version 1.0 was used for the release of Office 2000 in June, 1999. Shortly thereafter, Windows Installer became an official part of the Windows operating system, as version 1.1 of the Windows Installer was built into Windows 2000 and was also made available as a redistributable for older versions of Windows. Since that time, version 1.2 was released with Windows Me and the current version, Windows Installer 2.0, was built into and released with Windows XP. Version 2.0 of the Windows Installer is also available as a redistributable for earlier versions of Windows including Windows 95/98. Version 3.0 of Windows Installer is currently in beta.
Windows Installer design objectives
Open architecture
Prior to the creation of Windows Installer, there were (and for that matter still are) several third-party tools for creating installation setups for Windows applications. Many of these are quite sophisticated and powerful, and are widely used by independent and corporate developers alike. One difficulty with the setup packages created by such tools, however, is that they tend to be a “black box” as far as the end user is concerned. In other words, you can’t really know what is going on inside. This may not be a problem for the individual desktop user, but it can be a real concern for system administrators who might be responsible for deployment on dozens if not hundreds of machines in a tightly controlled environment. Another issue for system administrators is that they sometimes need to exercise a certain amount of control over the setup, perhaps configuring it differently for one group of users than for another group; traditional setup tools generally do not provide for exercising this type of control “in the field”.
Windows Installer addresses these issues by using an open architecture for its setup packages in the form a database whose schema is fully documented and available to the public, and by following a standardized sequence of steps to perform installations. In addition, the Windows Installer SDK provides tools that make it possible for system administrators and others to apply modifications to a setup database even if it was authored by someone else.
Standardized installation process
Regardless of which tool you use to author a Windows Installer setup package (InstallShield Express, InstallShield Developer, Wise for Windows Installer, or the Windows Installer SDK itself, to name a few), the end product is a standardized database in the form of an MSI file that the Windows Installer program will use to install your software. Although the installation instructions contained in the database will of course differ from one application to the next, the sequence of steps used by Windows Installer to process the database is essentially the same for all applications. This provides a high level of consistency and reliability for all software installations regardless of their source.
Managing shared resources
One of the biggest problems that could result from the installation of applications software was the possibility that a shared resource, such as a DLL file, would get overwritten by an incompatible or out-of-date version of the same file, or uninstalled by one application even though another application still needed it. Either of these situations could break another application that relied on the original file. Windows Installer addresses this issue, which is commonly referred to as “DLL hell”, by managing the registration of shared resources in such a way that this is far less likely to happen.
Managing state integrity of the computer
One of the other risks associated with some earlier software installation technologies was the possibility of leaving the computer in an unstable state if an installation failed or was canceled before completion. The types of problems that could arise from this include some files being copied but others not copied, registry entries made but corresponding resources not present, older files deleted but not restored upon cancellation, etc. Windows Installer addresses this issue by managing the entire installation as a transaction with rollback capabilities: either the entire installation succeeds and all changes are committed to the machine, or none of it succeeds and whatever was done up to the point of failure is rolled back. In this way, the target computer is left in a stable state, either as it was before the installation began or as it should be after the installation is complete.
Customization “in the field”
As mentioned earlier, system administrators often need to configure the installation of a particular piece of software differently for one group of users within their organization than for another group. Windows Installer makes this possible in at least two ways. One is that software installed by Windows Installer must be organized into “features”; features can be made optional, which then provides a choice as to whether to install them or not. Secondly, because of the open nature of the MSI database and the availability of tools to modify them in the field, such as Windows Installer transforms, system administrators are not stuck with whatever the application vendor or IT department provides them but can exercise a certain amount of control over the installation process.
Installation on “locked down” desktops
Another challenge faced by system administrators is the need to install software on machines whose day-to-day users do have administrative access rights to the machine. This can lead to problems if a setup package needs to do things that only an administrator can do. Windows Installer provides a solution to this challenge by allowing setup packages to be configured to run with elevated privileges even when the logged-on user does not have those privileges.
Inside a Windows Installer database
The core piece of a Windows Installer setup package is the MSI database. This is a relational database that utilizes data tables to describe all of the requirements for the setup. Like any relational database, an MSI database uses primary and foreign keys to establish the relationships between tables. All of this is familiar territory for Visual FoxPro developers, even though the physical structure of an MSI database is nothing like a VFP database.
To look inside of an MSI database, you need a tool. Some third-party Windows Installer-based development programs may provide their own tool for this purpose, but the tool provided by Microsoft is the MSI database editor called Orca. Orca can be downloaded from Microsoft as part of the Windows Installer SDK.[1] It is also available as part of the MSDN Universal subscription. After installing the Windows Installer SDK, you will find Orca.msi (the MSI file for installing Orca) in Program Files\Microsoft SDK\Bin; right-click on it and choose “Install” to install Orca.
Once Orca is installed on your computer, you can use it to open any MSI file. Because Orca is an editor as well as a viewer, you can also make changes to an MSI file using Orca. Of course, this is not something you will typically want to do unless you are very sure you know what you’re doing, any more than you would manually change a field in a table of a complex VFP database without understanding the potential impact that change might have on other fields and tables.
Summary Information
One of the first things to look at when opening an MSI file is the Summary Information Stream (SIS). This information will tell you about the contents of the MSI file. Figure 1 shows the SIS from the MSI file for this session’s sample application (myVFPApp) as viewed in Orca.
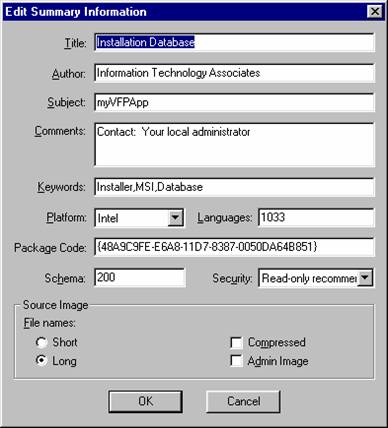
Figure 1. The Summary Information for myVFPApp.MSI can be viewed in Orca.
Because Orca is an editor as well as a viewer, the dialog shown in Figure 1 is an edit window as well as a display window. If it were necessary for you to change any of the information shown, you could do so via this dialog.
GUIDs and other IDs
One thing to point out here is the Package Code field, which you can see in Figure 1. Every MSI database that is released “into the wild” must have a unique Package Code; this is true even for each different version of the same product. GUIDs (Globally Unique IDentifiers) are used to make this possible, but it is up to you as the setup developer to make sure that each of your MSI database files has a unique Package Code GUID. Fortunately, most Windows Installer-based setup tools, including InstallShield Express that ships with Visual FoxPro, will change the Package Code GUID automatically every time you build a release, so this is not generally something you have to remember to do manually.
Two other GUIDs that are also important when working with MSI database files are the Product Code and the Upgrade Code. We’ll discuss the importance of these two GUIDs, along with another property called the Product Version, when we talk about upgrades and updates later in this paper. For now, you should simply be aware that each major version of a product (in Windows Installer terminology, your application is a “product”) should have a unique Product Code, and that all versions of the same product should have a common Upgrade Code. The Product Code and the Upgrade Code of an MSI database can be seen by looking at the Property table of the MSI file.
The Property table
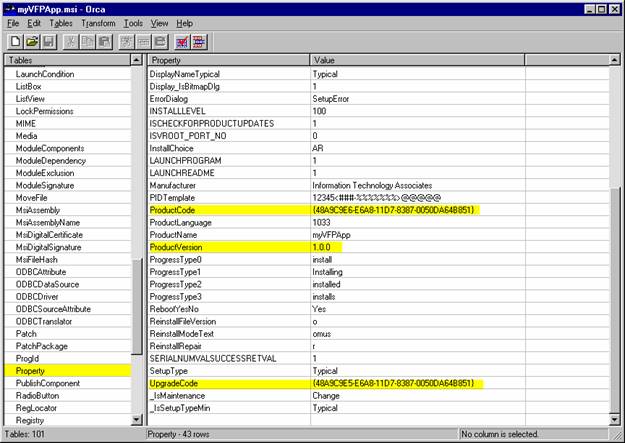
Figure 2. The Property table is where you will find the Product Code, the Upgrade Code, and the Product Version for the MSI file.
There are something like 89 permanent tables defined in the MSI 2.0 database schema. If you’re going to be doing a lot of work with MSI files or the Windows Installer SDK, you will want to become familiar with most if not all of these. As an application developer, however, you don’t need to know all the details, you just need to know enough to find your way around. You’re probably going to rely on a tool like InstallShield Express to build your MSI databases for you, but you’d like to be able to go in and see (and maybe even change) what’s in those databases from time to time.
When inspecting an MSI database for the first time, the Property table is a good place to start. In this table you will find the product name, the product version, the product code GUID, the upgrade code GUID, and a host of other useful information about the database. Figure 2 shows the Property table for myVFPApp.
The Feature table

Figure 3. Products are organized into Features, which can be seen in the Features table of the MSI database.
One of the key organizational concepts for products deployed with Windows Installer is that they need to be organized into features. A feature is the smallest unit of the product that the user can choose to install or not to install. In myVFPApp, the sample application for this session, there are three features: the main program and readme file, the data files, and the help file. Inside the MSI file, there is a Feature table that reflects this organization, as shown in Figure 3.
Note: In InstallShield Express, there is always one feature named “AlwaysInstall” and it is not optional. InstallShield Express also makes this feature not visible on the Custom Setup dialog by setting the Display property value to zero.
As we have already mentioned, an MSI database is a relational database, and as every VFP developer knows, relational databases employ primary keys and foreign keys to establish relationships between tables. The primary key field for a table in an MSI database is displayed as the left-most column in Orca. A foreign key field can be identified by the trailing underscore in its name. For example, in Figure 3, note the trailing underscore in the name of the next to last column, “Directory_”. This identifies the contents of this column as a foreign key into another table, specifically the Directory table in this case.
The Component table
At a lower level of organization, and unseen by the end user, a product is organized into components. Components are the lowest level of logical container in the product, and can be though of as the organization of the product as seen by the developer rather than the end user.
Components are the building blocks for features: a feature consists of one or more components. If a feature is installed, all of its components are installed. If a feature is not installed, none of its components are installed, unless one of the components is also part of another feature that is installed (a component can be associated with more than one feature).
In our sample MSI database, we can look at the Component table to see what components are used in our product. The Components table is shown in Figure 4.

Figure 4. The Component table has one row for each component in the product.
As you can see, there are probably more components than you would have thought. This is due to the addition of the VFP 8.0 runtime support libraries, the VFP 8.0 HTML support library, and the MSCOMCT2.ocx ActiveX control and its dependencies, all of which are required to run our sample application. These components, by the way, were added by simply including their merge modules in our setup program (InstallShield Express 4.0 in this case) – we did not have to deal with each of them individually, which is one of the benefits of merge modules. In addition to these components, you can spot MyVFPApp.exe and MyVFPApp.chm in the Component table.
The File table
The last table we will look at in detail here is the File table. As you would expect from its name, the File table contains one row for each file that is to be installed as part of this product. The File table for the sample application is shown in Figure 5. In this figure, the rows have been sorted alphabetically by name for easy reference; Orca enables you to sort the rows in a table by the contents of a column simply by clicking on the column header.
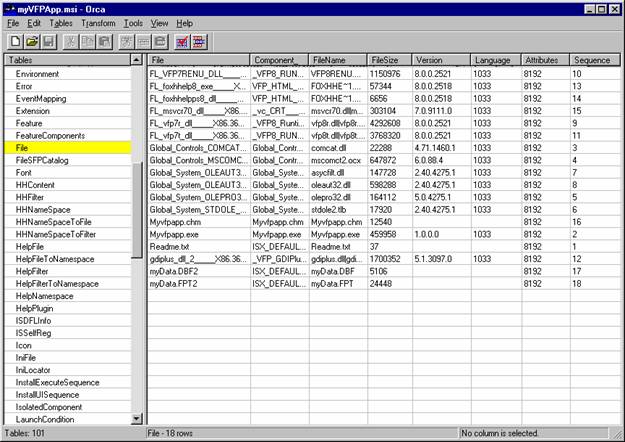
Figure 5. The File table has one row for each file that is to be installed.
The primary key for the File table is the File column, whose value is usually related to but not necessarily the same as the actual file name. Note that the second column, “Component_”, is a foreign key into the Component table. This establishes the relationship between each component and the file(s) that it installs.
Other tables of interest, although not illustrated here, include the FeatureComponents table, whose entries establish the relationship between the product’s features and the components that are associated with each of those features, and the Upgrade table, which contains information required to deploy a major upgrade.
Note: The version of InstallShield Express that shipped with VFP 7.0 lacked the ability to populate the Upgrade table, which was one of the major limiting factors to its effectiveness as a real deployment tool. Fortunately, the version of InstallShield Express that ships with VFP 8.0 does not have this limitation.
Now that you know how to open an MSI database file in Orca and how to find your way around the tables you’ll find inside, you are equipped to go exploring on your own. The MSI database file for this session’s sample application is included in the session downloads as myVFPApp.msi. Note that this is only the MSI database file, not a full install package; the full install package runs about 10.6MB as a single-image setup executable and is not included in the downloads because of its size.
We should add a couple of caveats before you open up other MSI or MSM (merge module) files with Orca.
- Remember that Orca is an editor as well as a viewer, and changes you make to a file, whether accidentally or on purpose, may have unintended consequences.
- Orca will change the Modified date of a file even if you don’t make any changes to it. This is usually harmless, but can have an effect on future updates due to the Windows Installer versioning rules for determining when to replace an existing file during an update. For example if you open the VFP 8 runtime files merge module in Orca, its Modified date will be changed and a future release of VFP 8 may not install an updated merge module like its supposed to.
In short, be sure you have a good backup before you go exploring in other people’s MSI or MSM files.
Designing applications with deployment in mind
You have seen from the discussion above that the concept of features and components is central to the organization of an MSI database, and hence to the entire Windows Installer deployment scenario. Therefore it only makes sense for you to think about your product (your VFP application) in terms of features and components from the very beginning of the design phase.
Features
In most cases, the delineation between features in your product will be fairly self-evident. For example, in the sample product myVFPApp, one feature is used for the main program, a second feature is used for the data files, and a third and optional feature is used for the help file. In general, the more features you use, the more control you will have later on when it comes time to design and deploy updates to your product. Naturally, there is a correlation between the number of features you decide to use and the complexity of the dialog the user will have to contend with when performing a custom setup. With a little forethought, a good balance can be reached early in the design phase.
Because VFP applications always involve database files in one form on another, data files are an obvious candidate for their own feature(s). This can be an important decision when it comes time to deploy an update, because updates can be structured to reinstall only certain features if desired. There are other ways to be sure that an update doesn’t overwrite a user’s live data files—always an important consideration for an update!—but putting the data into its own feature(s) in the setup is generally a good idea for this and other reasons.
Components
One thing to be aware of when determining how to structure your application in terms of components is that each component has a keypath resource, typically a file, that Windows Installer uses to determine if the component is installed or not. (The KeyPath property can be seen as the rightmost column in Figure 4, the Component table.) Identifying the most important files in your product and thinking about what else belongs together with them is one way to approach the decision about how to organize your product into components. Other component decisions, such as those for the VFP 8.0 runtime support libraries, will be made for you via their merge modules.
Keep in mind that a given component may be associated with more than one feature within a product. If two features are selected for installation and both features install the same component, Windows Installer will install the component only once.
Upgrades, updates, and patches
Probably nothing else about Windows Installer has caused more frustration among developers than trying to deploy a simple update to an existing product. Windows Installer is a powerful product. That power brings with it a certain amount of complexity, and this complexity certainly manifests itself when it comes to deploying updates. Fortunately, a little understanding goes a long way toward relieving the frustration that many first-time Windows Installer developers feel about this topic.
First, a little terminology needs to be introduced. In Windows Installer, you will hear talk of “upgrades”, “updates”, and “patches”. Each of these has a specific meaning, which we will explore in a minute. In general terms, however, each of them refers to the process of updating an existing product—that is, a product that is already installed on the computer—with a newer version of that same product. For the sake of convenience we’ll use the term “update” when talking about the update process in general, and will differentiate between the three terms only when it’s important to understand their differences.
Small updates, minor upgrades, and major upgrades
Windows Installer provides for three kinds of updates: a “small update”, a “minor upgrade”, and a “major upgrade”. (Note that we haven’t used the word “patch” yet – we’ll get back to that one in a bit). Keeping in mind that an MSI database is identified by its product version and by the value of the three GUIDs we mentioned earlier, the difference between these three types of updates can be understood in terms of which of these values gets changed between the original version and the updated version. The following table summarizes these differences.
Table 1. Small updates, minor upgrades, and major upgrades
|
Type of |
Package |
Product Version |
Product |
Upgrade |
|
Small update |
change |
don’t
change |
don’t
change |
don’t
change |
|
Minor upgrade |
change |
change |
don’t
change |
don’t
change |
|
Major upgrade |
change |
change |
change |
don’t change |
As you can see from Table 1, the package code, which identifies a specific MSI setup package, always changes. Again, remember that the Package Code must be unique for each MSI database that is released for installation of a product, so naturally it changes with any type of update.
Small updates and minor upgrades are used for updates that are not significant enough to warrant changing the Product Code. A small update changes the Package Code but does not change any of the other three properties. A minor upgrade changes both the Package Code and also the Product Version.
Note that the Product Version we are talking about here is a property of the MSI database; it is NOT the same thing as the “version number” you are accustomed to assigning to your VFP EXE file at build time. The version number assigned to your EXE file is also important, but its value is unrelated to the Product Version as far as Windows Installer is concerned.
The difference between a small update and a minor upgrade is that after installation of a small update Windows Installer cannot differentiate between the original version and the new version, because the Product Version did not change, whereas after installation of a minor upgrade Windows Installer can tell the difference. This has implications for future updates, and for this reason minor upgrades are generally preferable to small updates.
A major upgrade is used when deploying a major change to the product. A rule of thumb would be that you would use a major upgrade whenever you would change the first digit of the Product Version – for example, when releasing myVFPApp version 2.0 to replace myVFPApp version 1.0. In a major upgrade, both the Product Version and the Product Code are changed. Note that the upgrade code never changes: myVFPApp version 2.0 (and version 3.0, 4.0, etc.) will all have the same upgrade code as myVFPApp version 1.0.
Small updates and minor upgrades are handed by Windows Installer as a reinstallation of the older version of the product, while major upgrades are generally handled as the removal of the older product (if present) followed by a fresh installation of the newer product.
Because of this, the way you have to deploy a small update or a minor upgrade is a bit different than how you deploy a major upgrade. In all three cases, if there is no older version of the product on the target computer, the setup package should function as a fresh install. But if an older version of the product is present, then in the case of a small update or a minor upgrade Windows Installer must be told to reinstall the product using the new setup package.
Telling Windows Installer to reinstall the product using the new setup package requires that the values of the REINSTALLMODE and REINSTALL properties be set appropriately. Specifically, REINSTALLMODE should be set to ‘vomus’. (The order of these characters is unimportant, and you may often see ‘vomus’ written as ‘voums’.) Table 2 gives the meaning of these values. The REINSTALL property is typically set to ‘ALL’, meaning reinstall all of the features that were previously installed.
Table 2: Values of the REINSTALLMODE property.
|
Value |
Description |
|
a |
Reinstall all files (force reinstall – USE WITH CAUTION) |
|
c |
Reinstall a file if the file is missing or its checksum is invalid |
|
d |
Reinstall a file if the file is missing or if a different version is installed |
|
e |
Reinstall a file if the file is missing or if the same or an older version is installed |
|
m |
Rewrite all machine-specific registry entries |
|
o |
Reinstall a file if the file is missing or if an older version is installed |
|
p |
Reinstall a file only if the file is missing |
|
s |
Reinstall shortcuts |
|
u |
Rewrite all user-specific registry entries |
|
v |
Reinstall from the specified source (MSI file) and re-write the local cached package |
As you can see, the values ‘o’ and ‘s’ tell Windows Installer to overwrite older or missing files and to reinstall shortcuts. The values ‘m’ and ‘u’ tell Windows Installer to rewrite the machine-specific and user-specific registry entries.
The value ‘v’ is probably the most important here, because it tells Windows Installer to install from the new MSI file and to rewrite the cached copy of the file on the user’s computer. The reason that this is important is because without it Windows Installer will identify the Product Code and Upgrade Code of your update as matching those of the MSI file it has already cached from the original installation. However, because the Package Code in the new MSI file is different than the Package Code in the cached file, you will encounter an error stating that “Another version of this product is already installed”. This error message is probably one of the ones most frequently encountered when first working with MSI updates.
Using the ‘v’ parameter circumvents this problem. If you’re using a setup tool that can create a setup launcher (setup.exe) that can set these properties for you, then you don’t have to worry about setting them explicitly at installation time. But if your setup tool doesn’t have the capability to create such a setup launcher, then you will need to set these properties another way. There are several ways to do this: the values for these properties can be passed to the MSI executable (MSIExec.exe) either via the command line or via a setup.ini file. Regardless of how you go about it, though, the ‘v’ setting has to be set at installation time rather than being stored in the MSI database.
To force a reinstall from the new MSI file using the MSIExec.exe command line interface, use the following syntax:
msiexec /i myVFPApp.msi REINSTALLMODE=vomus REINSTALL=ALL
Setup packages (i.e., Setup.exe) created with InstallShield Express have their own command line interface. You can pass MSI command line parameters to MSIExec.exe through Setup.exe by using the “/v” option. To force a reinstall from the new MSI file using setup.exe, use the following syntax:
setup.exe /v”REINSTALLMODE=vomus REINSTALL=ALL”
To force a reinstall from the new MSI file via the setup.ini file, add these values to the CmdLine entry in the [Startup] section of the INI file, like this:
[Startup]
CmdLine=REINSTALLMODE=vomus REINSTALL=ALL
The CD_ROM type of build in InstallShield Express will create the MSI database, the Setup.ini file, and the Setup.exe launcher as separate files, along with the actual files to be installed. It is therefore a good type of build to use in situations where you are deploying a small update or a minor upgrade and must set the value of REINSTALLMODE using one of the methods described above.
Major Upgrades
Unlike small updates and minor upgrades, major updates are handled not as a reinstallation of an existing product but rather as the uninstallation of the existing product followed by the fresh installation of the updated product. Major upgrades therefore do not require using the REINSTALLMODE and REINSTALL property values as discussed above. Instead, a major upgrade works by populating the Upgrade table in the MSI database with one or more rows that specify the Upgrade Code GUID, minimum version, and maximum version of the older product to be uninstalled.
Figure 6 shows the Upgrade table from the setup package for version 2.0.0 of myVFPApp, which is constructed as a major upgrade. Notice that the Upgrade Code GUID specified in the Upgrade table is the same as the Upgrade Code GUID for versions 1.0.0, 1.0.1, and 1.1.0 of myVFPApp. Also notice that the VersionMin and VersionMax columns identify version 1.0.0 and version 1.1.0 as the minimum version and maximum version, respectively, of myVFPApp that are to be uninstalled and replaced by version 2.0.0.
Data files
Data files need special consideration during any kind of any update. Windows Installer uses versioning rules to determine when to overwrite an existing file of the same name. For unversioned file such as Visual FoxPro database containers, tables, indexes, and memo files, Windows Installer looks to the file’s Creation date and its Modified date; if these are different, Windows Installer assumes that the file has been updated by the user and does not overwrite it. This by itself affords some measure of protection against a product update overwriting a data file that has been updated by the user since the initial installation. You can go a step further and mark data files (or any file, for that matter) as ‘Never Overwrite’ – this can be done via the file’s property sheet in InstallShield Express, for example.
The versioning rules and even the Never Overwrite setting, however, do not protect against a data file being uninstalled along with the rest of a product during installation of a major upgrade. To prevent loss of data during a major upgrade, you should take the additional precaution of marking your data files as ‘Permanent’ in the initial installation, meaning that they should never be uninstalled. In InstallShield Express, this can also be done via the file’s property sheet.
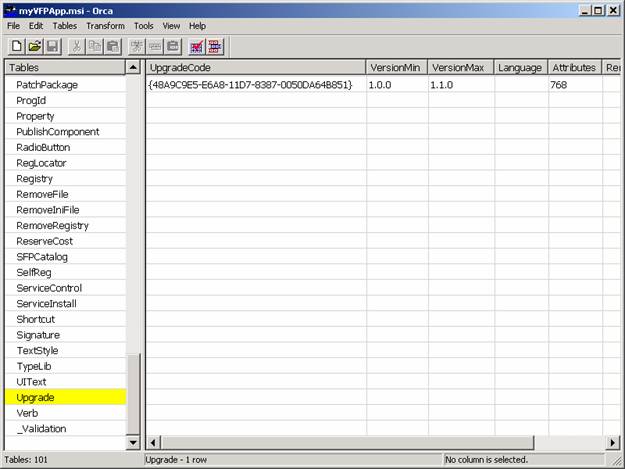
Figure 6.The Upgrade table identifies the older version(s) of the product that are to be replaced.
Patches
In Windows Installer, a patch is just another way of deploying an update, not a different type of update itself. In other words, a patch is simply another way of packaging one of the three types of updates you already know about.
A patch package represents the difference between two other installation packages. In order to create a patch package, you must start with two complete installation packages, one for the older version and one for the newer version of the product. One thing to keep in mind when planning to create a patch is that both of the source packages must have the same format: for example, both must be contain either compressed or uncompressed source files.
The actual creation of the patch package, which is a file with an MSP file name extension, can be accomplished using your setup development tool, if that tool is capable of creating patches, or by using tools provided in the Windows Installer SDK. The patch creation process involves looking at the installation package for the newer version of the product, comparing it to the installation package for the older version of the product, and then producing a file that defines the differences.
The primary benefit of deploying as update using a patch package is that a patch package will usually be much smaller than the full installation package. A patch package by itself, however, cannot be used to install the product; a patch package requires the presence of an older version of the product on the target computer, in order to have a base file to which the patch can be applied. (Actually, it doesn’t have to be an older version per se, it just has to be the case that there is some predetermined version of the product already installed so that the patch has something to be applied to. It is possible to construct what are called anti-patches to revert a product to an earlier version, but that’s a discussion for another day.)
In summary, patches can be a useful packaging alternative when distributing updates. Check the capabilities of your favorite Windows Installer-based setup tool to see what patching capabilities it offers. Also take a look at the patch creation tools provided in the Windows Installer SDK.
Conclusion
As VFP developers, we are immersed in the world of Microsoft technologies. Among the technologies that we have to interact and be familiar with are various system DLLs, ActiveX controls, data storage alternatives and database access methods, and of course the Windows® operating system itself. Since the release of Visual FoxPro 7.0, which lacked the old familiar VFP setup wizard, this list now also includes the Windows Installer. Whether or not you plan to use a Windows Installer-base setup tool such as InstallShield Express, you can improve your overall abilities as a developer by becoming familiar with this important core technology. On the other hand, if you do plan to use a Window Installer-based setup tool, then knowing what’s going on “under the covers” will certainly help you to understand why things happen the way they do.